
*Image is a representation of this item. Actual item may vary.*
Hover over image to zoom
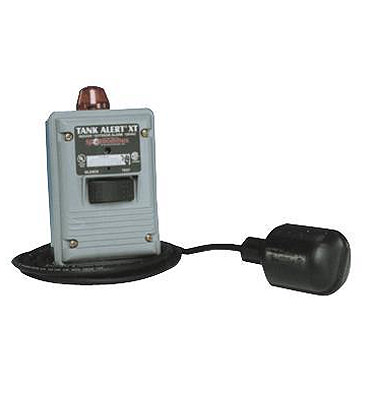
Little Giant 513273 HWXT High Water Pump Alarm
For Indoor/Outdoor Use
Ships From Manufacturer
Select Model & Quantity:
| Model # | Description | Price | Qty |
|---|---|---|---|
| 513273 | For Indoor/Outdoor Use | $305.67 |
Little Giant - 513273 - HWXT High Water Pump Alarm
Indoor/outdoor high water alarm. Type 3R watertight thermoplastic enclosure. Mechanical float switch with 15' (4.6m) cable. Alarm has red warning light, horn with silence switch and test button. Includes pre-mounted terminal block so enclosure can also be used as a junction box.
Stop! Required before ordering:
Unless specified above, all pumps are for water use only and are not to be used for any other purpose.
If you are selecting a pump that is designed for pumping products other than water, please check the chemical resistance chart to determine if your pump is fit for your purpose, application and that the pump and seals are compatible for your use.
Warranty is subject to the proper selection of material and seals of the product you are pumping.
Chemical Resistance Chart
- Lift pump chambers
- Sump pump basins
- Holding tanks
- Sewage and water removal systems
- Enclosure meets Type 3R water-tight standards
- Automatic alarm re-set, horn silence switch and alarm test switch
- Alarm horn sounds at 82 decibels at 10' (3 meters)
- Alarm system (when installed on separate circuit) operates even if pump circuit fails
- Complete package includes control switch with 15' (4.57 meters) of cable and pipe clamp for mounting
- Extra value includes pre-mounted terminal block so enclosures can also be used as a junction box for splicing pump, pump switch and power. Meets NEC standard for junction boxes
- UL/CSA Listed
- Voltage: 120 VAC, 50/60 Hz, 7 watts max (alarm condition)
- Alarm Enclosure: 6.5 x 4.5" (16.51 x 11.43 x 7.62 cm), indoor-outdoor, weatherproof, thermoplastic, meets Type 3R water-tight standards
- Pre-mounted terminal block
- Alarm Beacon: Meets Type 3R standards
- Test/Silence Switch: Certified to IP66 and IP68 standards
- Float Switch: Sensor Float control switch with pipe clamp
- Cable: 15' (4.57 m), flexible 18 gauge, 2 conductor (UL) SJOW, water-resistant (CPE)
- Float: 3.38" dia. x 4.55" long (8.58 cm x 11.56 cm), high impact, corrosion resistant PVC housing for use in sewage and non-potable water up to 140°F (60°C)
- Switch: Hermetically sealed steel capsule features mercury-to-mercury contacts
Installing Float Switch
- Determine desired activation level (see Figure A). Position float to activate prior to threatening liquid level condition. To adjust activation level, move pipe clamp up or down on discharge pipe.
- . Place the cord into the clamp as shown in Figure B
- Locate the clamp at the desired activation level and secure the clamp to the discharge pipe as shown in Figure B. NOTE: Do not install cord under hose clamp
- Tighten the hose clamp using a screwdriver. Over-tightening may result in damage to the plastic clamp. Make sure the float cable is not allowed to touch the excess hose clamp band during operation.
Installing Alarm
- Mount alarm box using existing holes in back of box. To ensure water-tight seal, use screws and sealing washers included with alarm.Note: Screws are to be located over wall stud or used with a wall anchor sized for a #8 x 1.25 self tapping screw.
- Determine conduit locations on alarm as shown in Figure C. Note: When used with a pump application, connect alarm to a circuit separate from the pump circuit. This allows alarm to continue to operate if the pump circuit fails.
- Drill holes for conduit entry, taking care not to damage bosses inside alarm box.
- Attach conduit. If alarm includes pre-mounted terminal block option, refer now to the Terminal Block Option Wiring Instructions.
- Bring float switch cable through conduit and wire to terminal block positions 1 and 2 as shown in Figure B.
- Wire power conductors to terminal block positions 3 and 4 and ground wire to ground termination post as shown in Figure B. Note: If terminal block option is used, attach ground wire as shown in Figure A of Terminal Block Option Wiring Instructions.
- If remote device is used, connect wires as shown in Figure B using supplied wire nuts.
- Attach alarm box cover using the four pre-installed screws.
- Turn on power. Light on switch should come on.
- Check installation by manually tipping the float. The horn and beacon should turn on.
- Push silence switch to test silence feature.
- Test unit once per week to insure proper operation.
 "
"